CSS Box Model
What You Need to Know:
- HTML Basics
- CSS Basics
- CSS Display and Positioning
What you will Learn:
- How to size content
- How to size padding and margins
- Hot to size borders
Why This is Important:
You’ve learned how to select and style individual CSS elements. You’ve also learned the different properties involved with display and positioning. We were able to control the elements relationships to one another but with the box model we are able to manipulate the actual element.
Box Model
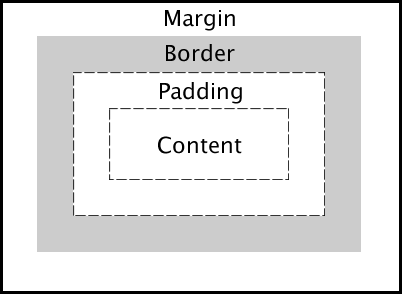
You can think of all elements on the page as boxes. Each of these boxes has several properties that contribute to its size. These are:
- Content: The text and images that are inside the element.
- Padding: The space between the content and the border. It shares the same background color or image as the content.
- Border: The (possibly decorative) border around your element.
- Margin: The space between the element and other elements. It will not share the same background settings as the content.

By default, when you set width or height on your element, it refers to the width or height of the CONTENT BOX ONLY. You must account for extra width/height if you add any padding, border, and/or margin.
Sizing Content
Content is sized most commonly either by using pixels:
p {
  width: 100px;
  height: 50px;
}
or by using percents:
p {
  width: 75%;
  height: 120%;
}
In the first example, the width and height will be the same no matter the element’s relationship to other elements. The second one, though, takes its width and height based on its parent’s width and height. So, for instance, if the parent of our second element is 100px wide and 200px high, our second element will be 75px wide (75% of 100) and 240px high (120% of 200).
Sizing Padding and Margins
Padding is sized by the properties padding-top, padding-bottom, padding-right, padding-left. To define all sides at once just use padding. Similarly, margin is sized by margin-top, margin-bottom, margin-right, margin-left, or margin. These properties are most commonly sized using pixels.
Example:
p {
  padding-top: 20px;
  padding-right: 200px;
  margin-left: 20px;
}
It is very common to want padding and/or margin on all sides of an element, but typing out each side separately gets very tedious. That’s where the padding and margin properties come in!
Examples:
p {
  padding: 100px 20px 30px 50px;
}
In our <p> tag, we see four values listed, which correspond to our four sides: top, right, bottom, left (be careful of the order!).
div {
  margin: 20px 50px;
  padding: 40px;
}
In our <div> tag, though, we see a margin property with only two values and a padding property with only one. This means our <div> has 40px of padding all around, and has 20px of margin on the top and bottom and 50px on the left and right (again, careful of the order! Top/bottom is first, then left/right).
NOTE: Margins do something frustrating yet special called “margin collapsing.” When two elements, each with a specified margin, line up one on top of the other, their margins are “collapsed,” meaning that, instead of adding the two margins together, the browser chooses the largest of the two margins, and that becomes the space between the elements. This only happens with top/bottom margins, though, not left/right margins. For example, if we had two elements like the following:
p {
  margin: 50px;
}

div {
  margin: 20px;
}
If the <p> were above the <div> (or vice-versa), the space between them would be max(50, 20) = 50px, but if <p> were to the left of <div>, the space between them would be 20 + 50 = 70px.
Margin collapsing actually has more rules than this, but this is the most common case.
Sizing Borders
Similar to padding and margin, border can be set using border-top, border-bottom, border-right, border-left and border. Unlike with padding and margin, though, we set the style and the color of the border in addition to its width. The syntax goes:
border: width style color;
Examples:
border: 3px solid red;
border: 10px dashed # 0000FF;
You may also wish to have a border with rounded corners. This is achieved using the property border-radius, which can be set using pixels or percents.
Example:
border-radius: 10px;
border-radius is also how we make elements appear like ovals or circles. If you set your border-radius to 50%, it will automatically become an oval. If, in addition, your content + padding makes a square, setting your border-radius to 50% will make a circle.
Activity: Celebrity Fansite:
Open your “celebrity_style.css” file:

Complete exercises 7 and 8 on the box model:
https://github.com/victoria/advanced-css-review
Conclusion:
With css selectors, display and positioning properties, and box model you can make the webpage of your dreams!